Content Highlights
Microsoft has made it harder to turn off Windows Defender permanently in Windows 10. However, you can disable Windows Defender temporarily from Security Settings, but antivirus is only paused until system restart, not actually deactivated. You need to play with advanced settings in order to disable Windows 10 antivirus forever.

In previous Windows 10 versions, it was easy to disable default antivirus but now Microsoft has started to deeply integrate Defender AV into Windows 10. That’s why we now need to tackle with Group Policy editor and Registry Editor in order to disable Window Defender antivirus permanently.
You should know what you actually want to do with Windows 10 default antivirus. For this purpose, let’s clarify following conditions or states of Windows 10 Defender AV:
- Pause protection temporarily from Windows Security Settings (That’s easy)
- Turn off protection permanently (Easy, but need some work)
- Deactivate Windows Antivirus (same as permanent turn off)
- Disable Windows Defender antivirus (same as permanent turn off)
- Uninstall Windows Defender from Windows 10 (not possible for most users)
From the above mentioned states, there are actually two conditions: first pause (first one) and secondly disable (all other except first). We will explain both here.
If you want to turn off Defender for a short time, you can temporarily deactivate this antivirus service from Windows Security Settings. While if you are looking for a permanent solution and want to completely stop Windows 10 antivirus and its services, you will need to do some work (edit values in Windows Registry Editor and Group Policy).
What is Windows Defender?
Before you get rid of the default protection, you should know a few thing about Windows Defender:
- What is Defender?
- Who installs it in Windows 10?
- How it works?
- Why it is important?
- Should you remove Defender antivirus?
Let’s solve this in plain language.
Microsoft Windows Defender is a part of Windows Security Center, which is responsible to safeguard your Windows 10 device from a vast range of security threats. It protects you from viruses, worms, hacks, malware, spyware and other security threats.
Windows Defender Security Center delivers a robust suite of security features that keep you safe for the supported lifetime of your Windows 10 device.
Microsoft Comprehensive Security
When your PC is protected by Windows Defender Antivirus you are receiving comprehensive protection for your system, files and online activities from viruses, malware, spyware, and other threats. Peace of mind has never been this easy.
It was formerly known as Microsoft Security Essentials in previous versions of Windows (Windows 7, Windows XP etc). Now it has turned into a sophisticated security suite which includes Firewall, Parental Control, Edge browser security against web threats and Find My Device features,
it comes pre-installed in Windows 10 by default and you do not need to install or activate it manually. It is totally free with no subscription or hidden costs. Microsoft has developed Defender to make Windows 10 secure and safe from the first moment of installation.
Why Disable Windows Defender Antivirus?
Though Defender AV safeguards your PC and precious data from virus, malware, ransomware, hacks, etc. Sometimes it interferes your computing; for example:
- Block software or game installation
- False positive
- Prevent new devices or drivers
- High CPU usage while scanning files in background
- Slowing down file copy / move operation
In these situations, it becomes necessary to stop Defender protection either for a while or completely stop protection service. That’s why you need to learn how to turn off Windows Defender Antivirus in Windows 10 OS.
How to Disable Windows Defender in Windows 10?
There are three methods to disable Windows Defender (permanently or temporarily).
- How to Disable Windows Defender Antivirus from Windows Security Settings (Temporary)
- How to Disable Windows Defender Antivirus using Group Policy Editor (Permanent; only for Windows 10 Pro, Enterprise and Education)
- How to Disable Windows Defender Antivirus using Registry Editor (Permanent; for all editions including Windows 10 Home)
Disable Windows Defender from Windows Security Settings
This is the easiest method but only a temporary solution. It means this method does not disable Windows Defender antivirus permanently, but temporarily. However, this is the recommended method from Microsoft and some layers of security will still protect you even you turn off protection using this method.
To turn off security features temporarily, follow these steps:
1 – Click here to open Windows Security or click on Start and search Windows Security in Windows search and open it.

2 – Turn off following options if you want to complete disable Windows Defender antivirus:
- Real Time protection (Disabling this option is enough to turn off protection)
- Cloud-delivered protection (optional)
- Automatic sample submission (optional)
Now you have it turned off temporarily. You can turn it on whenever you want or it will automatically turn on when you restart your computer.
Disable Windows Defender using Group Policy Editor
Before you proceed with Group Policy method, make sure you have the right edition of Windows 10 installed. This method only works for following editions:
So, if you are using Windows 10 Home, you will not option because Group Policy Editor feature is not available in Home edition. But don’t lose heart, Widows 10 Home users can click here to learn how to disable Defender using Registry Editor method. While Pro, Enterprise and Education users can continue to follow below steps:
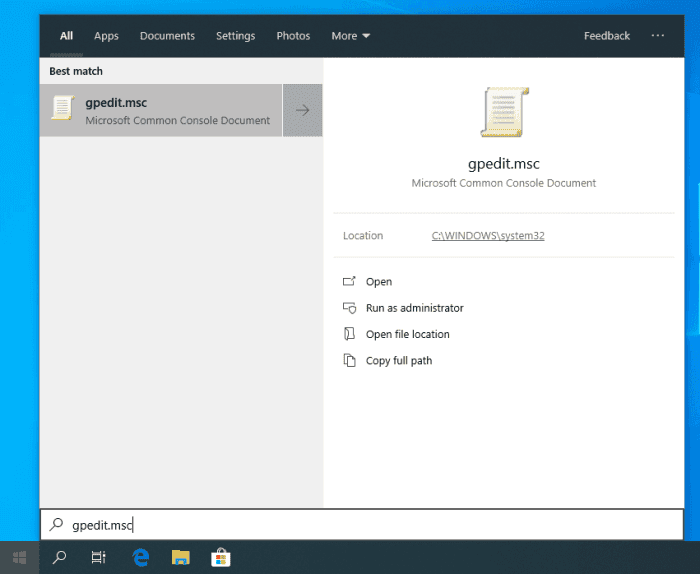
1 – Click on Start and type/search gpedit.msc. Click the first result to open Local Group Policy Editor.
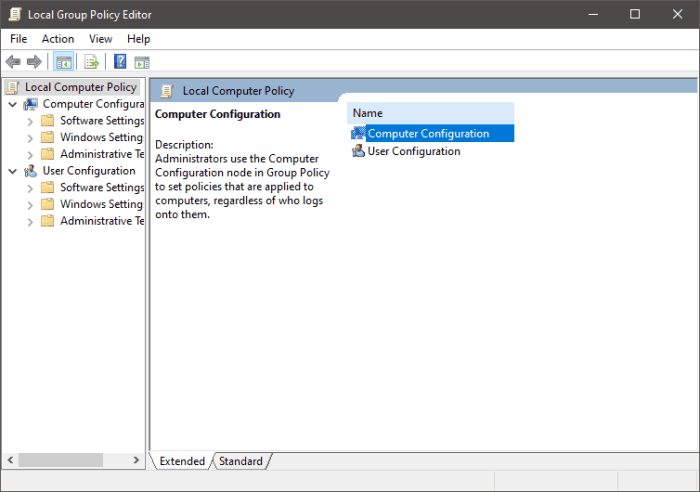
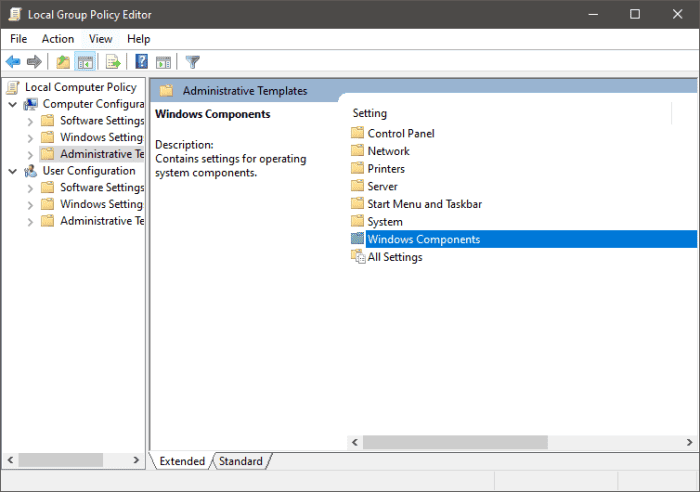
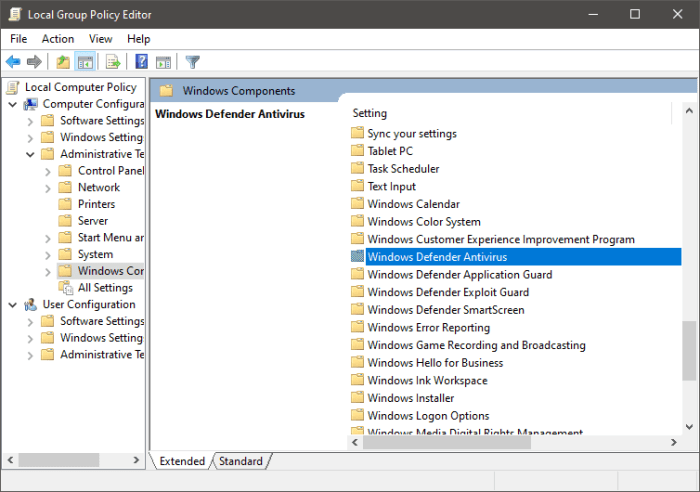
2 – Navigate to the following path:
Computer Configuration > Administrative Templates > Windows Components > Windows Defender Antivirus

3 – Double click (or right click and select Edit) on Turn off Windows Defender Antivirus policy.
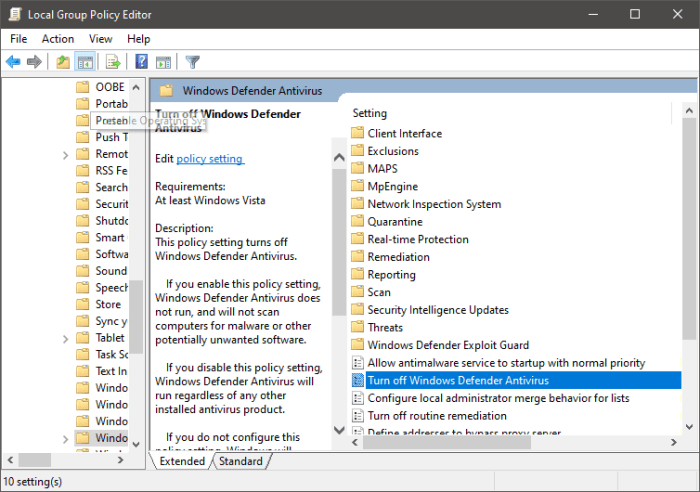
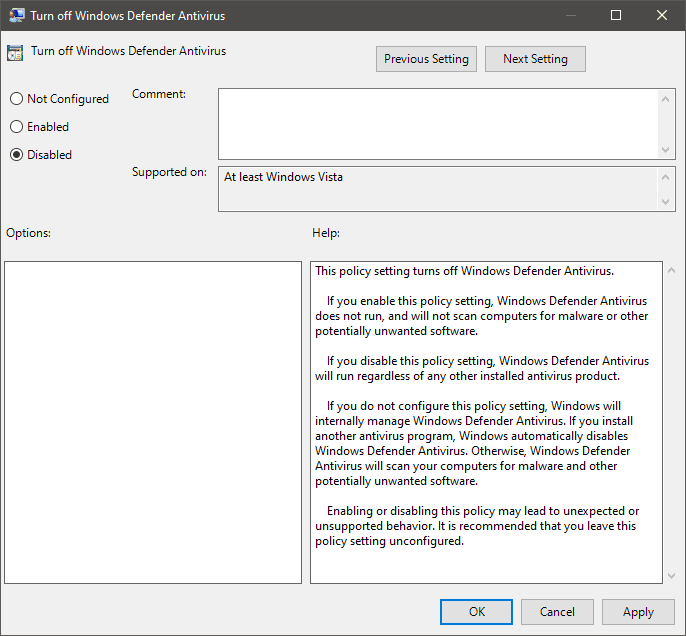
4 – You will see three option in edit policy dialog. Select Enabled to turn off antivirus (don’t confuse). Here is the function of each option:
- Not Configured (default)
- Enabled (select it to turn off Windows Defender Antivirus)
- Disabled (select it to turn on Windows Defender Antivirus, if already turned off)

5 – Click Apply or OK to save changes.
6 – Restart computer. It is necessary to restart in order to apply changes.

The changes will take effect after restart. Windows 10 default antivirus will be permanently disabled when you login next time.
You may confuse to see a shield icon on taskbar. It appears because this icon belongs to Windows Security, not only defender. It means that you only disabled antivirus, not other security services like firewall, Find My Device, Parental Control, etc. That’s good because you still have security layers other than antivirus.
How to Enable Windows Defender using Group Policy Editor?
Whenever, in future, you realize or need to enable Windows Defender antivirus using Windows Group Policy Editor, you can do so. Just follow all steps mentioned above (which were used to turn off antivirus) and select Disabled instead of Enabled in step 4. Then save and restart your computer.
Disable Windows Defender using Registry Editor
This method works on all editions of Windows 10; including Pro, Enterprise, Education and Home. This method will turn off Defender Antivirus forever, until you turn it on manually. Therefore, remember the steps (or bookmark this page in browser) for future reference.
Note: Editing Windows Registry can be risky. You may destroy your Windows installation if you changed or damaged sensitive registry values. Therefore, be careful and strictly follow our instructions given below in this tutorial. It would be a wise decision to make a full backup of PC or at least backup Windows Registry before you proceed with this method.
Ready? Let’s start.
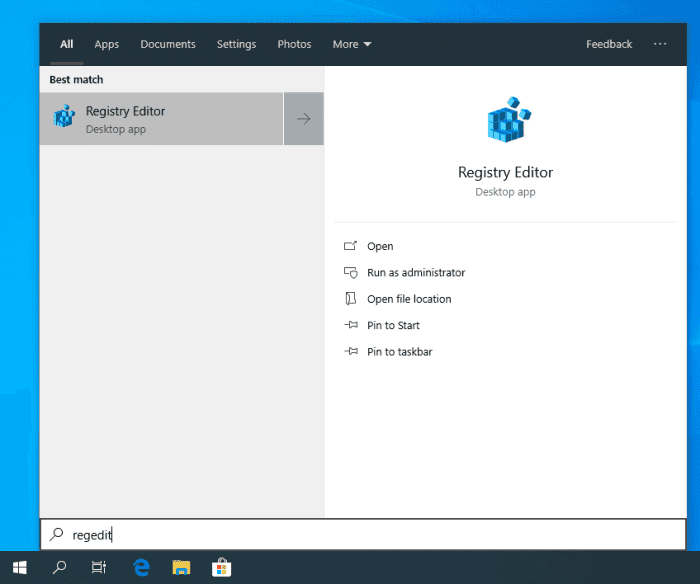
1– Click on Start and type/search regedit. Click the first result to open Registry Editor.
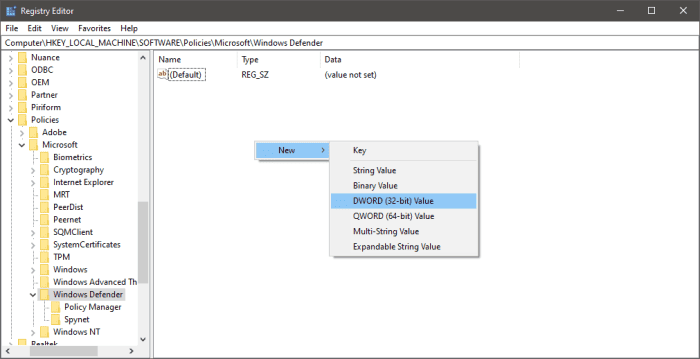
2 – Navigate to the following path: (simply copy the following path and paste in Registry address bar for quick navigation).
HKEY_LOCAL_MACHINE\SOFTWARE\Policies\Microsoft\Windows Defender

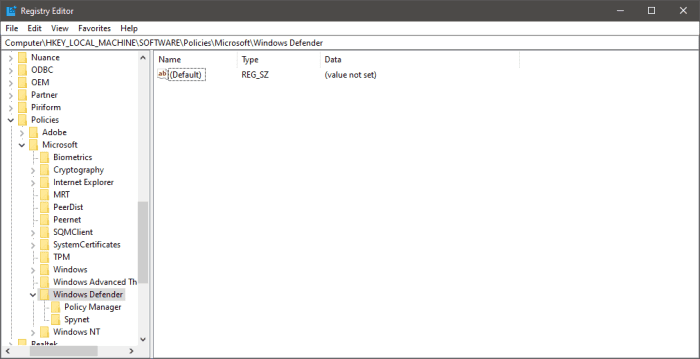
3 – Right click in blank area (right pane) and choose New > DWORD (32-bit) Value
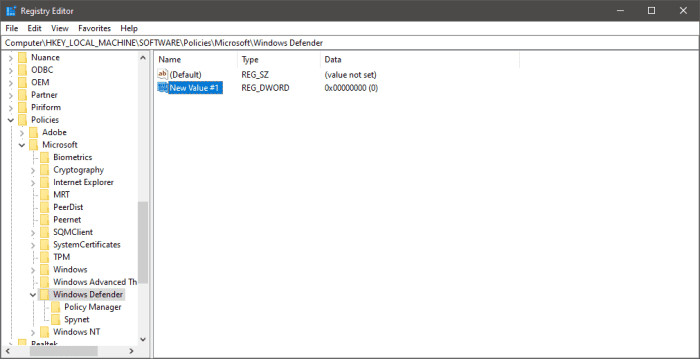
4 – Name (or rename) this key DisableAntiSpyware and press Enter key on keyboard.
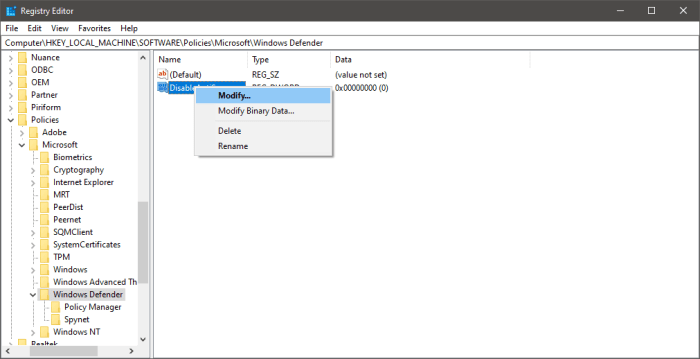
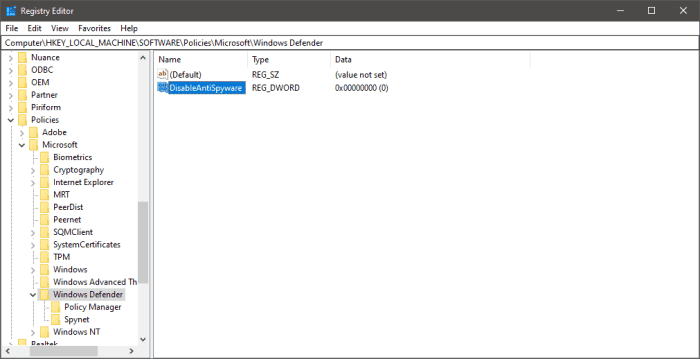
5 – Now double click (or right click and choose Modify) this DWORD key and change it value from 0 to 1.
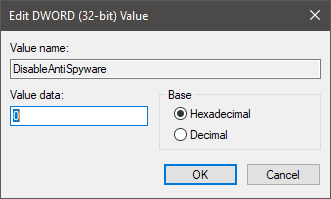

6 – Click OK to save changes.
7– Close Registry Editor. Restart computer. It is necessary to restart in order to apply changes.
Now you will see antivirus turned off when you login to Windows 10. You can check antivirus activation status in Windows Security Center.
How to Enable Windows Defender using Registry Editor?
Whenever, in future, you realize or need to enable Windows Defender antivirus using Registry Editor, you can do so. Just follow all steps mentioned above (which were used to turn off antivirus) and change the DWORD key value from 1 to 0 in step 5. Then save and restart your computer.
Windows Defender Disabled Permanently. What’s Next?
So you have successfully turned off Windows 10 default antivirus, but what would happen to your computer now? You might answer that the computer will run faster without high processor usage and no more installation blockages. That could be right but this is not the end of story because your computer is now vulnerable to threats and security risks.
Completely turning off does makes sense if and only if your computer system is an isolated machine. It means neither you transfer data/device in nor out of your PC, which is almost impossible in this era. However, if you have such type of machine then you can live without an antivirus software. Otherwise, you must think at least twice before getting rid of this built-in security suite.
You must ask yourself whether is it safe to remove defender antivirus from Windows 10? And what are the alternatives to Windows 10 Defender programs which could safeguard your computer without blocking installations or overheating CPU?
Is it safe to completely disable Windows Defender Antivirus from Windows 10?
Let us ask you a question; Do you feel safe without a lockable entrance gate or door in your house? The answer can be ‘Yes’ and ‘No’ at the same time. But how?
Yes, it is possible in the following scenario:
If you are living in a peaceful state, city or village; or in heaven where everybody know their limits and do not interfere with other’s property, then you can live without a safety fence and unlocked entrance door. It actually means nobody enters or exits your home without your permission. This is an ideal situation and only possible in rare cases. In a computer, it is possible to create same situation if and only if you cut the internet, break USB ports, DVD/CD drive and all things which are used for input and output, including devices. Thus, you can use a computer without an antivirus if you neither input nor output anything with your computer.
When it becomes impossible to use a computer without security guard software?
But now a days, most of us can not live without internet and input/output devices. Our Windows machine would be nearly useless without input and output. Connecting to internet means living in a big, seriously very big city where all types of people live. Therefore, it is not possible to live in this situation without proper security measures. No matter how useless or painful it feels, it is surely far less painful than losing your assets and property by an unauthorized person. It means you ultimately need an efficient security to safeguard and survive online.
Alternatives to Windows Defender Security Suite
So you found default antivirus causing problems for you and there is no easy way other than disabling Defender permanently. Now your PC is at high risk. The best solution is to choose an alternative antivirus suite.
If you already have been using an antivirus and comfortable with that, then you can simply keep using that one. When you install a third party security suite, the Defender will automatically deactivate in favor of new suite. However, if you are looking for a new antivirus then here we have some most popular alternatives to Windows Defender:
- Avast Antivirus
- AVG Antivirus
- Bitdefender Antivirus
- Kaspersky Antivirus
- Malwarebytes Anti-Malware
- Avira AntiVir Personal
- ESET Smart Security
Caution! Though Windows Defender may use high CPU, slow down performance and prevent specific software/game installation, this is not a useless package. Windows Defender Antivirus suite is nearly All-in-One security solution for Windows 10. Do NOT turn off / disable / deactivate Defender AV for a long time (unless you install an alternative antivirus program for Windows 10).