Content Highlights
The ultimate tutorial on installing SCCM client agents on workgroup computers using ConfigMgr.
Here I’ll show you how to deploy SCCM Client Agent to workgroup PCs and show you the steps you need to take to do it successfully.
Requirements / Prerequisites
- The client must be able to determine the fully qualified domain name of the management node (FQDN).
- Adding a new entry to the Host file may be required.
- Port
- Connecting the Client to the Central Management Server: Communication between the client (TCP port 80/443) and the SUP (Software Update Point) (TCP port 8530/8531)
- Manual installation of the SCCM client
- Neither the client push mechanism nor the manual installation of the SCCM client is applicable to workgroup PCs.
- For this reason, the Management Point must be specified on the installation command line, as the client will not be able to locate it in Active Directory.
- Specifics regarding the site code must be given at the install command line.
How to Install SCCM Client on Workgroup Computers
- Create a copy of the SCCM client’s code on the device’s local storage.
- The SCCM Client Setup file can be found in the location where you opened the elevated command prompt.
ccmsetup.exe /mp:<Management Point FQDN> SMSSITECODE=001 SMSMP=<Management Point FQDN> DNSSUFFIX=<domain suffix>
windowstan.com

Verify the Management Points’ settings and lines of communication. (The management point’s FQDN may appear to be empty if the client is unable to access it.)

Now is the time to inspect certain crucial logs, including:
- C:\Windows\CCM\Logs\ClientLocation.log
- C:\Windows\CCM\Logs\LocationServices.log
How to Approve Workgroup Computer Client in SCCM?
The default setting for SCCM client approval is to automatically authorize machines in trusted domains.
Find this option in the: Administration / Site Configuration / Sites / Hierarchy Settings

Computers in workgroups will not be approved for use with SCCM in this configuration.
Therefore, once clients appear in the SCCM console, they must be approved.
Approve a client by right-clicking on them and selecting the appropriate option.
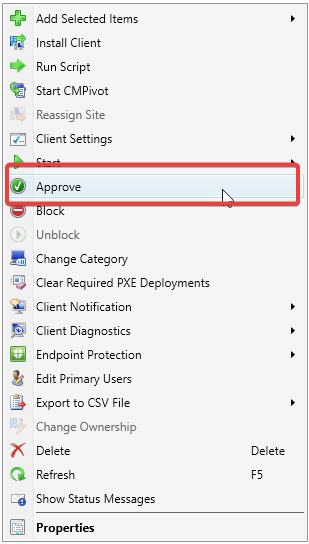
Acknowledgment of approval

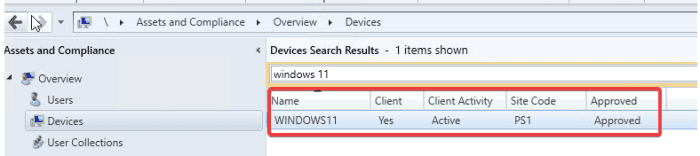
After a few moments, the SCCM agent will be able to do any necessary steps, at which point you may check the status of the SCCM Client Registration by looking in the logs located at C:WindowsCCMLogsClientIDManagerStartup.log.

The client will show online and commence stock reporting eventually.
Error Codes During Installation:
- 2: The system was unable to locate the file that was given.
- 5 means that access is denied.
- 52 – Due to the existence of a second user with the same name on the network, you were unable to connect. Check to see that the DNS does not contain any duplicate names, and verify that no two computers share the same IP address.
- 53: Unable to locate – Cannot connect to the administrator
- $ – Computer Browser is not started – Add File/Print Sharing to Exceptions in Firewall – Turn on File and Print Sharing $ – Computer Browser is not started
- 58 – The given server is unable to perform the requested operation. The operation that was requested
- 64 – The given network name cannot be used because it is no longer available. Windows 67: the network name could not be located in the source.
- 86 – Is the password for the network incorrect? Machine Name > the name that was resolved.
- 112 – Not enough disk space
- 1003 – Unable to finish performing this function.
- 1053 – The service did not react in a timely manner to the request to start or control the operation.
- Error code 1068 indicates that the dependent service or group could not be started.
- 1130 This command cannot be processed because there is insufficient storage space on the server. The network path was either improperly typed, does not exist, or the network provider is not now available. This is indicated by the error message Windows 1203, which may be found here. Please try retyping the route or contact your network administrator.
- 1208 – There has been an error that spans multiple lines. Log on to Windows 1396 as the source. Error: The target account name that you entered is wrong. (NBTSTAT, a reverse lookup; IP address duplication)
- 1450 – The requested service cannot be completed because insufficient system resources are available. Source: Windows \s2147749889 – Generic WMI failure (Broken WMI) \s2147749890 – not found – Source: Windows Management (WMI) – try repair WMI \s2147749904 – Invalid class – Source: Windows Management (WMI) \s2147749908 – Initialization failure – Source: Windows Management (WMI) \s2147942405 – Access is Denied (Firewall rule? / MacAfee-HIPS?)
- Error 2147944122: The RPC server could not be reached.
- Server execution did not succeed with error code 2148007941